Understanding, Components, Benefits, and Limitations of Dumpy Level Surveying

Understanding, Components, Benefits, and Limitations of Dumpy Level Surveying
About Dump Level Instrument:-
An optical tool for leveling and surveying tasks is the dumpy level. Included in it is a telescopic tube that is securely fastened using two collars and adjustable screws. The following is a list of the upcoming events for the year.
You can move the telescope on the dumpy level around the horizontal plane. The dumpy level can be used to calculate the relative height of survey stations on the ground.
Willian Gravatt created the dumpy level in 1832. He made the dumpy level using a Y (Wye) level instrument because he was a civil engineer.
Principle of Dumpy Level Instrument:
The dumpy level works because it uses a built-in telescope and a bubble level to link two or more places visually. Steps can be taken to reach the desired accuracy level.
It is also known by many other names, including “Y(Wye) Level,” “Surveyors Levels,” “Builders Level,” and “Dumpy Level.”
Accuracy of Dumpy level over other levelling instruments:
The accuracy of the Dumpy level is the main benefit over other leveling tools.
The majority of chemometric algorithms have good accuracy values at a dumpy level. A dumpy level can be accurate to within 1:4000 for every 100 meters.
Use of Dumpy level in Surveying:
Surveying a construction site involves measuring the dumpy level, which is essential. Dumpy levels are a popular option for surveyors due to their accuracy and portability.
- The prime reason for performing levelling on a construction site is to the make the field level and even.
- To determine is the differences in height between two points.
- To measure the height and distance of the different locations of the surveying land through the principle of relativity.
- To the measure following distance amongst various point on the surveying land.
- Setting out levels & inclined surfaces for the construction.
- To the draw contours on Land.
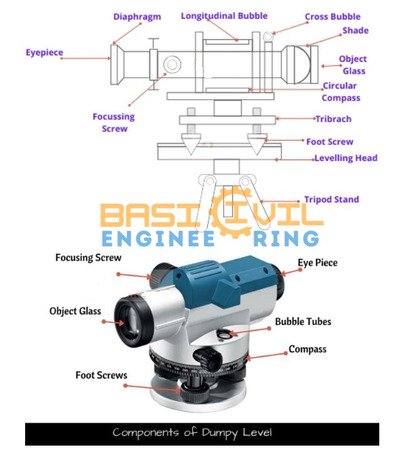
The telescope measures the line of sight distance of distant objects. The telescope is typically attached to a vertical spindle, allowing for easy movement in different directions.
The numerous components that make up a telescope are all listed below.
- Eye Piece: It is comprises of the magnifying glass and is primarily used by the observer.
- Objective Piece: it is placed at the farther end of the eyepiece. It is comprises a convex lens and a concave lens.
- Diaphragm: Provided in the outline of the eyepiece with the cross of the dark metal. They are provided to the bisect object.
- Focusing Screw: They are meant to the align the focus and image clarity of object.
- Ray Shade: Prevents sunlight from entering the objective lens.
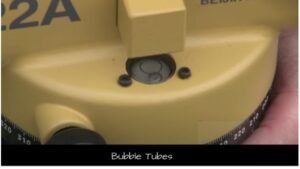
2. Bubble Tubes
These are offered to align the instrument’s level, provided in horizontal and vertical directions by bubble tubes. The device is prepared to survey when both bubbles are in the center.
3. Compass
It is employed to ascertain the magnetic bearing of the survey line’s course. The compass has a pointer for indicating directions. The compass is set up to take a magnetic bearing northward.
Read More
-
How to Calculate Cutting Length of Stirrups in columns
-
Concrete Compressive Strength -Cube Test [PDF], Procedure, and Results
-
Top 30 Questions and Answers for Interviews About Surveying
-
What’s the Contour Mapping?
-
Responsibilities of a Land Surveyor
-
What is the Bricks & Important Tests on Brick
-
Difference between a one-way slab and a two-way slab
4. Vertical Spindle
It is situated in the instrument’s center. The telescope benefits from rotating vertically. A conjunction point between a tripod and a telescope is intended at the Vertical Spindle.
5. Tribrach
It is used largely to regulate the instrument’s horizontal level and runs parallel to the leveling head. Foot screws hold the trivet in place.

6. Foot Screws
Through the bubble tube, the foot screws are utilized to calibrate the instrument. Tribrach plate calibration is done by adjusting the foot screws. Foot screws are turned to make sure the bubble is in the center.
7. Levelling Head
It is also referred to as a trivet and comprises two parallel triangular plates. It has grooves for holding foot screws.
8. Tripod
The entire dumpy level’s supporting medium is a tripod. It consisted of three legs made of light or hardwood, hollow steel pieces, or both. The tripod is kept motionless with only mild jerks thanks to the steel soles that are given at the foot.

The procedure of surveying on Dumpy Level:
The step-by-step process for conducting a survey using a dumpy level. A site’s survey through a low level can be completed with ease. The dumpy level is a two-man operation; to complete it, one may need at least a helper. The sorts of equipment that are needed to start the surveying activity are given below.
- Dumpy Level
- Tripod with foot screws.
- E-meter Staff/ English Staff
The surveying operation can start as soon as the instruments above are available. To finish the surveying procedure, the following actions must be taken.
Setup a Benchmark [BM]:-
The surveying method begins at a predetermined baseline whose height to Mean Sea Level is already known (MSL). This benchmark’s historical data can be found in earlier surveys. Some examples of benchmark data are churches, governmental structures, municipal buildings, railroad station boards, etc. If data are unavailable, one may select a random point (temporary benchmarks such as a fence post or other object) and assume a height.
Location and Position of Dumpy level:
Choose a location where you can see the benchmark well. It is advised to position the instrument in the middle of the area so that you can see every site, including any benchmarks.
Setting up Dumpy level on Tripod:-
The Tripod must be planted on the ground to keep the dumpy level effectively. Generally speaking, the tripod height needs to be set to eye level. The tripod stand’s legs must be sufficiently wide to support the instrument and must be firmly planted in the ground.
The tripod stand’s foot screws must be used to firmly and securely fasten the dumpy level to the stand. Make sure the equipment is securely fastened with a tripod. Special care should be given when handling the level head due to its extreme sensitivity and high cost.
The Dumpy level must be visible in the entire horizontal direction to function correctly. Foot screws, also known as leveling screws, could be utilized to create a leveled situation. To line the alignment bubble with the center of the marking level, the leveling screws must be adjusted. Leveling screws are further adapted to bring the drop to the center.
Observations and Readings:-
Backsight [BS] Reading:
The rear sight is the first reading a surveyor needs to make. You can determine the instrument’s height using backsight reading (H.I.). We can move forward with additional foresight-level lessons thanks to these two readings. The staff should be held “vertically” on the benchmark by the second guy (helper). The surveying process starts with the operator looking through the telescope’s eyepiece and rotating the dump level until the crosshairs are aligned with the E staff. Then look closely and pay attention to the figures on E Staff. Both metric and imperial measurements are used on the crew. The staff’s “E” marking represents 5 cm on a metric scale.
Height of the Instrument (H.I.) or Height of the Level:
You need to know the height of the backsight, which we observed in the previous stage, to determine the height of the level. The instrument’s height will be determined by adding the benchmark height to the backsight height.
Height of the level = Bench Mark(BM) height + Back Sight Reading
Foresight readings:
After determining the instrument’s height, you are now prepared to begin the foresight readings. Find and mark the A, B, and C locations on the ground where you want to determine the level. The E Staff should be placed vertically on the desired point (“A”). Repeat the process we used to determine the backsight height for getting readings from the E Staff. Find the projected size of (Point “A”); note the lessons from E staff.
Calculating the Reduced level:
The difference between the instrument’s height and the reading for foresight determines the reduced level.
Reduced Level = Height of the instrument – Foresight reading
The results are tabulated in the below table.
| Reading No. | Identification point | Benchmark Height | Backsight | Height of Instrument | Reduced Level |
|---|---|---|---|---|---|
| 1. | |||||
| 2. | |||||
| 3. | |||||
| 4. |
This lower level provides information about how much backfill or excavation is required to level the ground.
Example:
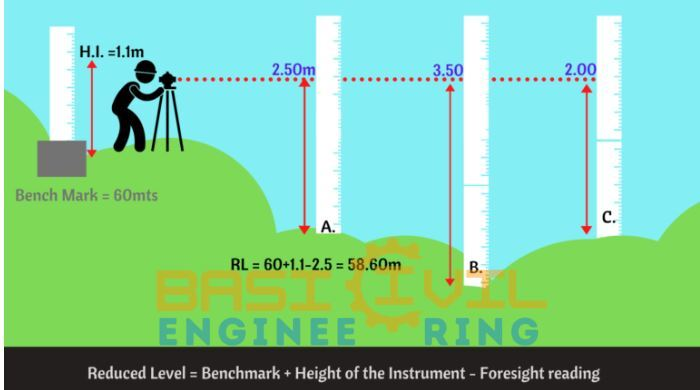
You can easily see in the above image that leveling the land is required to build any structure there.
The benchmark height was 60 meters.
The instrument is 1.1 meters tall.
And point A’s foresite height is 2.50 m.
Level reduced: 60 + 1.1 – 2.5 = 58.60 m.
You have a straightforward task: determine the lowered levels of points B and C from the following image, and then write your answer in the comments.
Precautions while setting up Dumpy level:
It’s all about levels in the dumpy level. The instrument should be handled with the appropriate safety measures. If not, the instrument will degrade and produce false readings.
- The tripod needs to be raised to eye level.
- When moving around, try to avoid touching or pressing on the tripod.
- Watch out not to trip over the tripod’s legs when maneuvering around it.
- Constantly examining the bubble because even the smallest change can produce erroneous results.
- A soft surface shouldn’t be used to set up the device.
Advantages of the Dumpy Level:
One of the most well-known and popular surveying tools is the dumpy level. The following are some of the main benefits of dumpy level:
- simpler design with fewer moving parts.
- Minimal changes must be made.
- It is adaptable for long-duration surveys thanks to its high stiffness.
- increased optical power.
- cost-effective when used on different construction locations.
Limitations of the Dumpy Level:
Dumpy level even has certain restrictions despite being such a powerful tool. These restrictions reduce the application in some ways.
- just at the location that measures horizontal angles.
- The values obtained may have a certain degree of discrepancy.


